Most Useful Short keys In Photoshop

I always see people doing things the long way in Photoshop, and not getting anywhere fast, so I've decided to share some useful keyboard shortcuts in Photoshop. These shortcuts I heavily use instead of clicking on tools and it can make your life 50x simpler. So take some time and read this! It could save you a lot of time when using Photoshop


CTRL+C
Copy
CTRL+C+CTRL Copy Merge
CTRL+V Paste
CTRL+E Merge Down
[ Brush Size Increase
] Brush Size Decrease
CTRL+ALT+SHIFT+S Save For Web
ALT+SCROLL Zoom Out/In
CTRL+J Duplicate Layer
CTRL+D Deselect
CTRL+G Group Layer(s)
CTRL+A Select All
CTRL+T Free Tranform
CTRL+R Show/Hide Ruler
CTRL+Z Undo!
CTRL+Z+ALT Step Back ( Super Undo )

This Tutorial Was Written For PC's, Macs are different and the shortcuts do vary.

If you learn to use Photoshop shortcuts you will notice everything becomes a lot faster. There are many more short keys, but these are most of the basics and most useful ones.

Don't forget to look around at my other tutorials!

-Zeezed


My New Kitty


We have no name :3. We currently do not have name for the little fella' but non the less he is cute :) So like always I had to take our my camera and take some photos of the cute kitten. New photography model? I think so. Be sure to keep your eye open for more photos of this cute guy!


Panda and I!

This was just something I did for fun, I haven't made anything for a long time sooo.... here you go. Little bit of photoshop and some photography can go along way ;)

and yes this means zeezed is panda friendly.


Photoshop Photo Animation Tutorial


Hello and welcome to my new photoshop animation tutorial made for zeezed! This weeks tutorial I will be teaching you how to make simple animations! Lets get started shall we!


For this tutorial I've created a 200x200 ( 72 res. ) file with two layers, one being "a" and one being "b".


We'll be playing around with these two layers. Things you need open:

-Layers
-Animation

These can be located in the photoshop drop down menu "windows" like below:


after you've done that you should get this window at the bottom:


Here is a diagram in case this is foreign area of photoshop for you
diagram


Before we start I will tell you the first effect we'll be learning today, sliding. Pretty simple, frame b will be sliding left across frame a. You'll need to select the move tool (V) and slide your frame all the way to the left so you cannot see it.

Now while holding down shift hit your right arrow key once. Now you'll have this


now go down to your animation box and click on the duplicate frame button:


and repeat this step until the B layer has went from one side to. You'll get this:


-------------------------------------------------------

EXTRAS

------------------------------------------------------
The next style we'll be doing it fading. In adobe animations you can also edit the opacity so you can make cool fade effects. This is how:

Start off with your B frame showing and edit the opacity and take away 10% and duplicate frame like you did above. Continue to do so till your get to 0%. You're done, should look like this:
-------------------------------------------------------
Take all opacity off of layer B ( or you can click on the eye icon and make it invisible ) and duplicated frame and change opacity to 100% ( or if you make it invisible turn on the visibility ).


Photoshop photo retouching zeezed style


Photoshop is an amazing tool and here at 
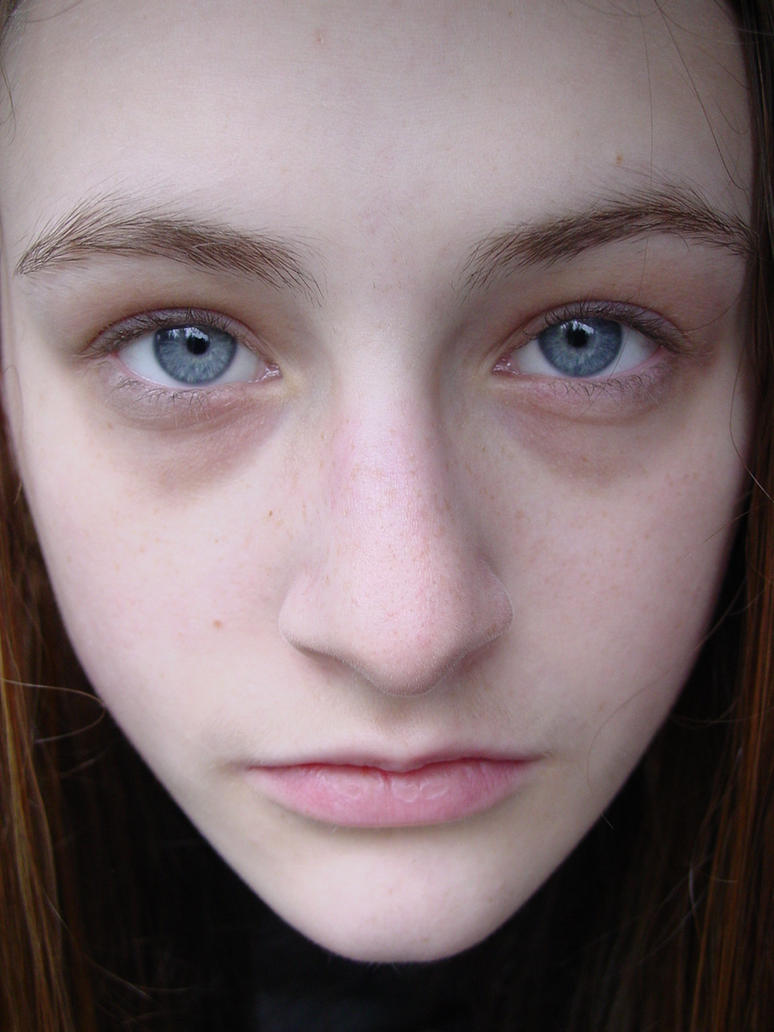
zeezed I'm going to teach you my own personal secret way of enhancing any photo with simple steps! First you will need to locate the photo you want to enhance, head shots work the best for this. Here is the photo I found online;


by ~PorcelainStock
porcelainstock.deviantart.com/art/plain-face-49780353

As you can see I selected a photo of the most natural looking, no makeup or any distractions in the background, as natural as it gets and quite beautiful. So lets start editing!

The first thing in photoshop we need to tackle is the bags under her eyes, unfortunately if you're a normal person you never get enough sleep in a day and these bags will develop. So how do we take them out? Stamp Tool! Which is located at the left tool bar or you can press (s).

While holding down ALT select right under the dark area ( Be sure to have a soft brush selected! ) and slowly start removing the darkness under the eye by clicking multiple times ( if you're new to this tool try messing around at first in another document to get use to it ). This is what I got:


By the way I have my clone brush settings to this:


So now that we're done the biggest "problem" of this photo we need to start editing the skin tones! The easiest thing ever!

Make a new layer. ( name doesn't matter )

Go to your brush tool.

Select the color #f2d1a6 ( this may vary with different skin colors ). The reason I picked this skin flesh color is because its bright and will lighten up the skin.

Apply color all over the face like so;


and now change the layer blending mode to soft light.Take a your eraser tool and use a soft brush to remove anything that isn't the face, it should look like this:


Repeat this step for the eyes( switch the color to a brighter color of their eye color ). Then change the opacity of the layer to make it look natural. and you're done! You can further edit it with an adjustment layer, which I did to get a more enhanced look:


Once again I really urge you to check out :

PorcelainStock


There are a lot of great stock photos!

I hope you liked my tutorial, this was written strictly for Zeezed and you have no right to use this without permission. If you would like to use this tutorial please contact me.


Photoshop basics, Color Theory

Zeezed's Color theory

Everything with design has color theory and photoshop comes at no acceptation . Today I will be showing you the basics of color theory and showing you a wonderful site to make your like 20x easier! So lets get started!


First off, what is color theory?
in the visual arts, color theory is a body of practical guidance to color mixing and the visual impacts of specific color combinations.
-Wikipedia.

That about sums it up, and in basic sense, it makes things look hot.

Now there is a very practical way of learning color theory, and its called a color wheel. Here is what one looks like ( colors may be off slightly ):


Now there is much more complex color wheels but this one is the basic one. This chart can be divided into three groups, as shown in the following diagram:


I do not refer to these charts when I am using photoshop or doing any other design like thing, I memorized it, its like learning your ABC's but for art, just something you got to learn.

We now know the color wheel but how can we use it? There are many ways to use it and I will show you the most popular one.


Complementary:

Have you ever noticed the colors of Christmas? Red and green, well those are complementary colors! Pick a color on the color wheel and whatever is on the opposite side is its complementary color. Simple enough, like so:


There are also more color scheme which can be used in your photoshop designs (what have you), like:
Analogous Color Scheme

Split Complementary Color Scheme

Triadic Color Scheme

Tetradic Color Scheme


Now if you want to get a perfect color scheme every time there is an online application that you can use from adobe. Adobe made this a few years ago its called Adobe Kuler. I use this site all the time when I use photoshop. User friendly so just go wild!

Adobe Kuler


I hope you liked my tutorial, this was written strictly for Zeezed and you have no right to use this without permission. If you would like to use this tutorial please contact me.


Problems. UPDATE

I've had some technical issues with my external hard drive, I've lost everything on it so I posting is going to stop for a week or two. Also all other projects for zeezed will be on hold for a little while till I can rebuild and remake a few things that are essential. Also I must remake a few things in photoshop for this site again ( example: logo ).


But...


I will make this up to you, I will be writing more photoshop tutorials and I have a few things in my mind for this blog, a few things that will really push this blog further. Also I will be introducing some of my own photoshop resources for download! So I promise you stick around and wait because it will be worth it.


Have a great day! ! !